이는 URL의 범위가 어디까지 인가에 대한 혼란인 것 같다. RFC1737에 따르면 PATH, 쿼리스트링 모두 URL에 포함된다.
httpaddress http://hostport[/path][?search]
이런 혼란이 생긴 이유중에 하나로 HttpServletRequest의 잘못도 있다고 생각한다.
    @GetMapping("/user")
    public void test(HttpServletRequest request, @RequestParam("id") int id) {
        String uri = request.getRequestURI();
        String url = request.getRequestURL().toString();
        logger.info("uri - {}, url - {}", uri, url);
    }
로그를 찍어보면 아래와 같이 나온다. uri - /user, url - http://localhost:8080/user
이걸보고, '아 url에 쿼리스트링은 포함되지 않는구나' 에 더불어 'uri는 path 부분을 말하는구나' 라고 착각할 수 있을 것 같다.
HttpServletRequest의 문서를 읽어보면
getRequestURI public java.lang.String getRequestURI() Returns the part of this request's URL from the protocol name up to the query string in the first line of the HTTP request. The web container does not decode this String. For example: First line of HTTP request Returned Value POST /some/path.html HTTP/1.1 /some/path.html GET http://foo.bar/a.html HTTP/1.0 /a.html HEAD /xyz?a=b HTTP/1.1 /xyz To reconstruct an URL with a scheme and host, use HttpUtils.getRequestURL(javax.servlet.http.HttpServletRequest).
Returns: a String containing the part of the URL from the protocol name up to the query string See Also: HttpUtils.getRequestURL(javax.servlet.http.HttpServletRequest)
getRequestURI()는 URL(URL은 URI이므로)의 일부분(path)만 리턴한다고 되어있고, 전체 URL을 얻고 싶으면 다른 방법을 쓰라고 되어있다. getRequestURI()의 리턴값 /user 은 URL의 일부일 뿐, URL은 아니다. method명이 혼란을 주는 듯 하다.
getRequestURL public java.lang.StringBuffer getRequestURL() Reconstructs the URL the client used to make the request. The returned URL contains a protocol, server name, port number, and server path, but it does not include query string parameters. Because this method returns a StringBuffer, not a string, you can modify the URL easily, for example, to append query parameters.
This method is useful for creating redirect messages and for reporting errors.
Returns: a StringBuffer object containing the reconstructed URL
여기서는 또 URL에서 쿼리스트링을 빼고 리턴하겠다고 한다. 때문에 쿼리스트링은 URL이 아닌 것 처럼 혼란을 주는 것 같다. getRequestURL()의 리턴값 http://localhost:8080/user은 URL의 일부일 뿐, URL은 아니다.
결론
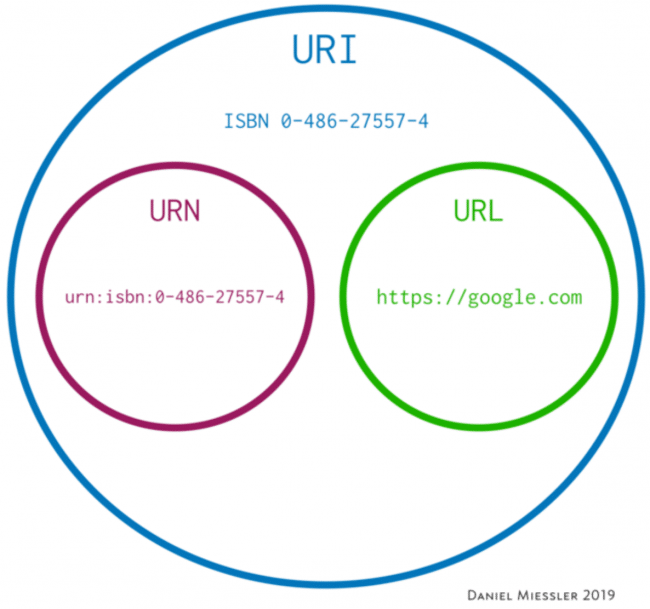
URI는 리소스 식별자이다.
URL은 리소스를 어디서 얻을 수 있는 지 위치를 말해준다. URL는 식별방법의 일부이다.
또 다른 식별방법으론 고유한 이름을 부여하는 URN이 있다.
Appendix
RFC says
A URI can be further classified as a locator, a name, or both. The term “Uniform Resource Locator” (URL) refers to the subset of URIs that, in addition to identifying a resource, provide a means of locating the resource by describing its primary access mechanism (e.g., its network “location”). rfc 3986, section 1.1.3
URI는 위치, 이름 등이 될 수 있다.
The URI itself only provides identification; access to the resource is neither guaranteed nor implied by the presence of a URI. rfc 3986, section 1.2.2
URI는 식별만 할 뿐, 리소스를 어디서 얻을 수 있는지를 반드시 제공해야하는 것은 아니다.
Each URI begins with a scheme name, as defined in Section 3.1, that refers to a specification for assigning identifiers within that scheme. rfc 3986, section 1.1.1
Filter와 Interceptor, 둘 다 전후처리 용도로 사용될 수 있다는 점에선 동일한 것 같다. 구체적으로 어떤 차이가 있는 지 정리해보았다.
Filter
Filter는 Java의 Servlet 스펙에서 정의된 개념이다. Java Servlet의 스펙이므로 스프링 프레임워크가 없이도 사용 가능하다. SpringMVC를 사용하는 경우 DispatcherServlet 전후로 호출된다.
Interceptor
Interceptor는 스프링의 스펙으로, Filter와 목적은 동일하나 좀 더 세분화된 컨트롤을 제공한다.
When to use Interceptor
세분화된 컨트롤을 하고자 하는 경우
Filter는 전, 후 처리만 가능하지만 Interceptor는 preHandle, postHandler, afterCompletion로 세분화된다. 그 외 WebContentInterceptor, LocaleChangeInterceptor 등의 상황에 맞게 활용할 수 있는 다양한 인터페이스를 제공한다.
ModelAndView를 컨트롤 해야하는 경우
Filter는 DispatcherServlet의 영역이 아니기 때문에 ModelAndView에 접근이 불가하다. Interceptor는 DispatcherServlet 사이클 안에서 사용되므로 ModelAndView를 접근할 수 있다.
HttpServletRequest, HttpServletResponse를 유연하게 컨트롤하고자 하는 경우
Filter는 다음 Filter로 체이닝을 할때 새로운 HttpServletRequest, HttpServletResponse를 넘길 수 있다. Interceptor는 이미 DispatcherServlet으로 넘어온 상태이기 때문에 HttpServletRequest, HttpServletResponse를 다른 인스턴스로 교체할 수 있는 방법이 없다.
예를 들어 다음 상황에서 Filter가 좀 더 유연하다.
ServletRequest의 Body를 여러번 읽어야 하는 경우 (ex: 로깅) ServletRequest의 Body는 한 번 밖에 읽을 수 없다. 여러번 읽을 수 있게 원본 Request에서 읽은 내용을 byte[] 버퍼에 저장해둔 새로운 ServeletRequest를 정의하여 넘길 수 있다.
이처럼 재정의한 인스턴스로 넘길 수 있기 때문에 유연하게 내가 원하는 기능을 추가할 수 있을 것이다.
동시다발로 요청을 하는 경우 이 값이 계속 업데이트되면 문제가 되지 않을까 생각했는데, 그렇지 않다. MySQL 공식 문서에 따르면 다음과 같다.
For LAST_INSERT_ID(), the most recently generated ID is maintained in the server on a per-connection basis. It is not changed by another client. It is not even changed if you update another AUTO_INCREMENT column with a nonmagic value (that is, a value that is not NULL and not 0). Using LAST_INSERT_ID() and AUTO_INCREMENT columns simultaneously from multiple clients is perfectly valid. Each client will receive the last inserted ID for the last statement that client executed.
커넥션 별로 _LAST_INSERT_ID_가 관리되므로 여러개의 요청이 동시에 발생해도 문제가 없다.
@Configuration
public class MyConfig {
  @Bean
  public MyBean getMyBean() {
    ...
  }
}
@EnableAutoConfiguration
@Configuration이랑 헷갈릴 수 있으나 다른 개념이다.
클래스패스와 내가 정의한 빈에 기반해서 필요할 것 같은 나머지 빈들을 알아서(지능적으로) 추측해서 생성해주는 역할이라고 한다. 예를들어 tomcat-embedded.jar이 클래스패스에 있는 경우 TomcatServletWebServerFactory 빈을 추가로 등록해준다. 스프링부트의 핵심 기능이라고 볼 수 있다.
예를 들어 Thymeleaf 관련해서 AutoCongifuration이 어떻게 동작하는 지 보면
@Configuration(proxyBeanMethods = false)
@EnableConfigurationProperties(ThymeleafProperties.class)
@ConditionalOnClass({ TemplateMode.class, SpringTemplateEngine.class })
@AutoConfigureAfter({ WebMvcAutoConfiguration.class, WebFluxAutoConfiguration.class })
public class ThymeleafAutoConfiguration {
 // ...
}
TemplateMode.class, SpringTemplateEngine.class 요 두가지 클래스가 클래스패스에 있는 경우 ThymeleafAutoConfiguration의 빈들을 생성하는 방식이다.